
My Top 10 Tips For Cinematic 360 Videos
Jul 26, 2023
If you want to take your reframed 360 videos to the next level by using a more cinematic style, there are a few key concepts to consider: from choosing the right settings and shooting techniques to making creative editing and reframing decisions.
There are many different ways to add a cinematic feel to your shots. Achieving a cinematic look is one of many different areas you'll need to master as a 360 video creator.
There's also:
👉 Choosing the right gear
👉 Mastering your editing and reframing process
👉 Knowing the best creative techniques
👉 And so much more!
This is why I've developed my brand new course, 360 Video 101 which lays out my exact five-step framework for creating viral-worthy 360 videos from scratch. So, if you get value from this article and are keen to unlock the full potential of your 360 camera, then follow this link to get access.
Let's dive into my top 10 tips for cinematic 360 videos! 👇
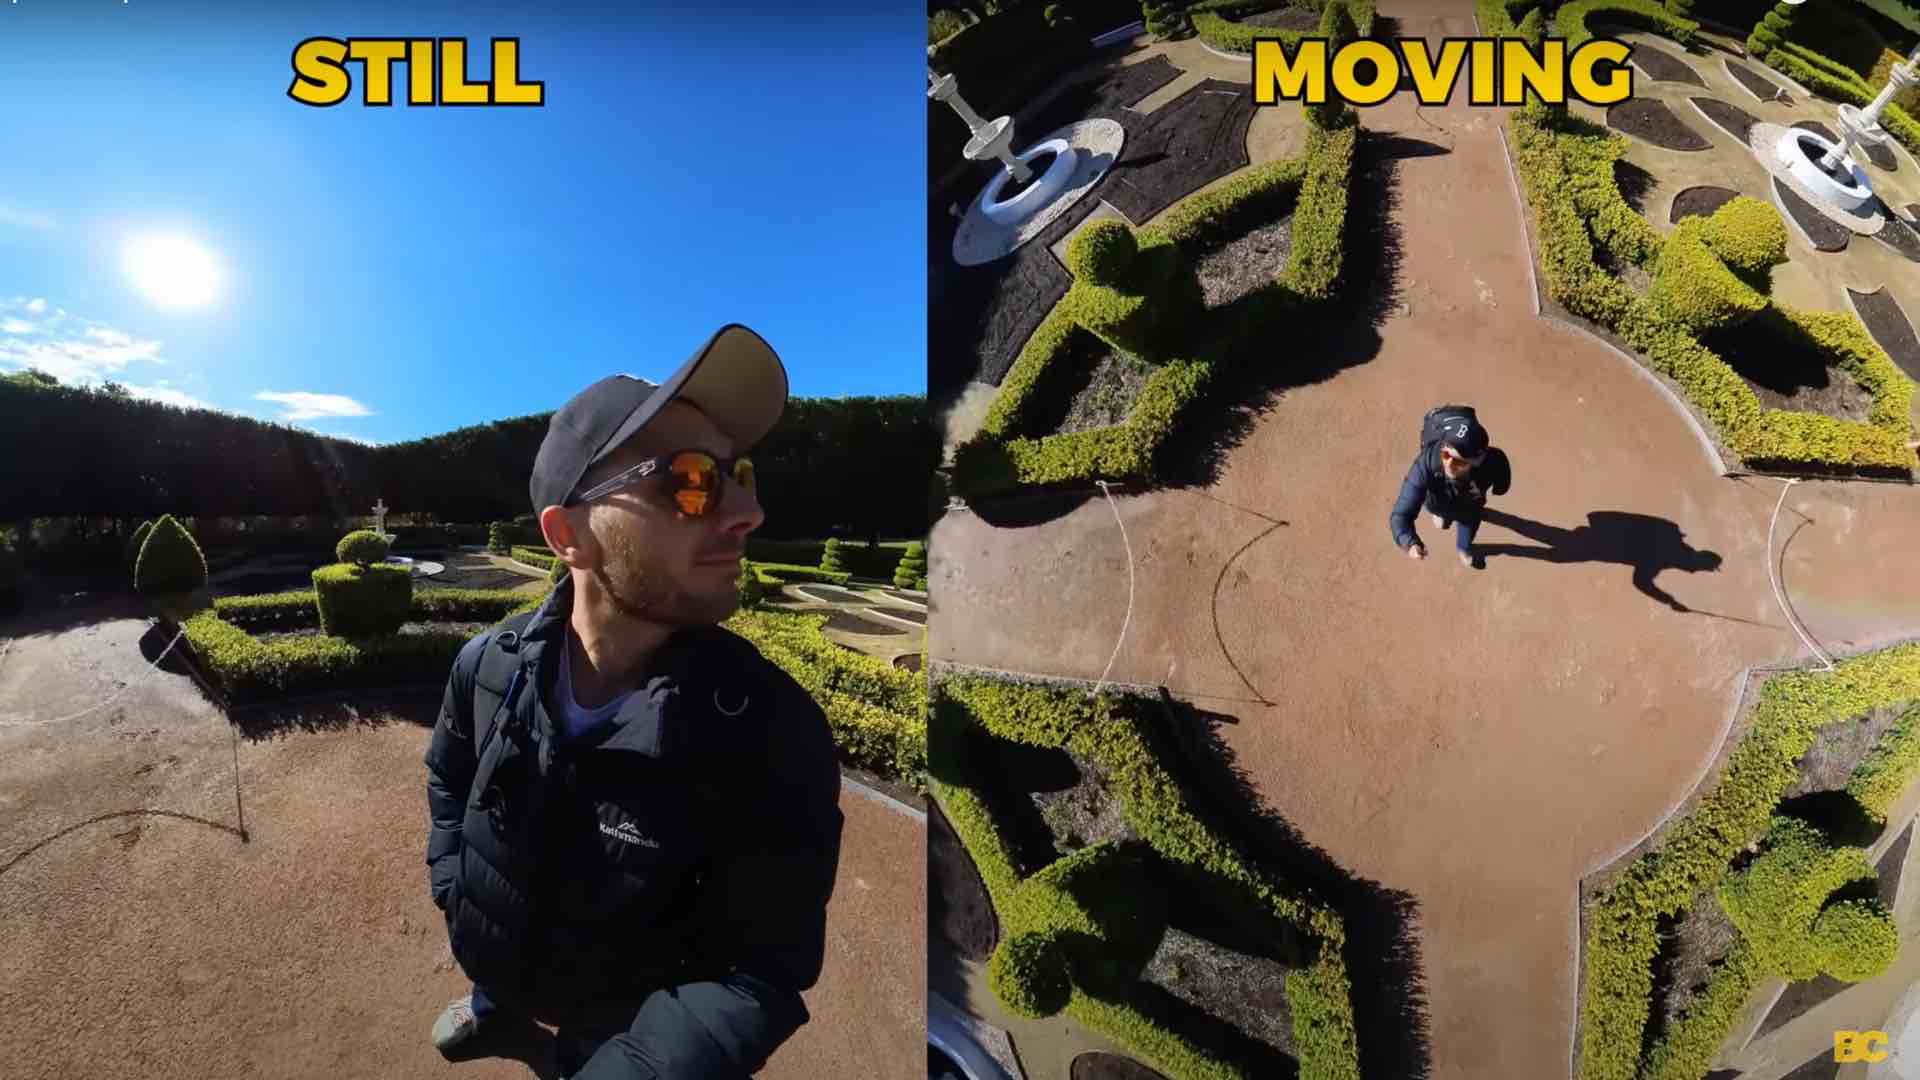
1. Utilizing Camera Movement 📹
Tip one is that it's really important to utilize camera movement.
When I was back in film school and studying the great directors of cinema history, something I noticed was that they used a lot of locked-off shots on tripods and didn't really move the camera. So I followed their approach, and the films I made were admittedly a bit on the boring side. This is because these directors were greats in the 1940s and 50s, and cinema was only in its early stages back then.
Fast forward to today, and attention spans are so short that you have merely a few seconds to capture your audience's attention, or they'll move on to the next thing. Which is why you need to make your shots dynamic, and the best way to do that is by utilizing camera movement.
Even the most basic movement, like walking through your location with your camera on a selfie stick, makes it instantly more exciting than if it were locked off and not moving. And there aren't too many scenes that I can think of where it actually works better not moving. So whenever you're at your location, think about how you can move your camera around to create a more dynamic and exciting shot.
2. Perfect Symmetry ✅
Tip two is when shooting subjects, make sure they're perfectly centered in the middle of the frame. Whether it's focusing on people, objects, or man-made structures, a slightly off-center or side position won't be as visually satisfying as achieving perfect symmetry.
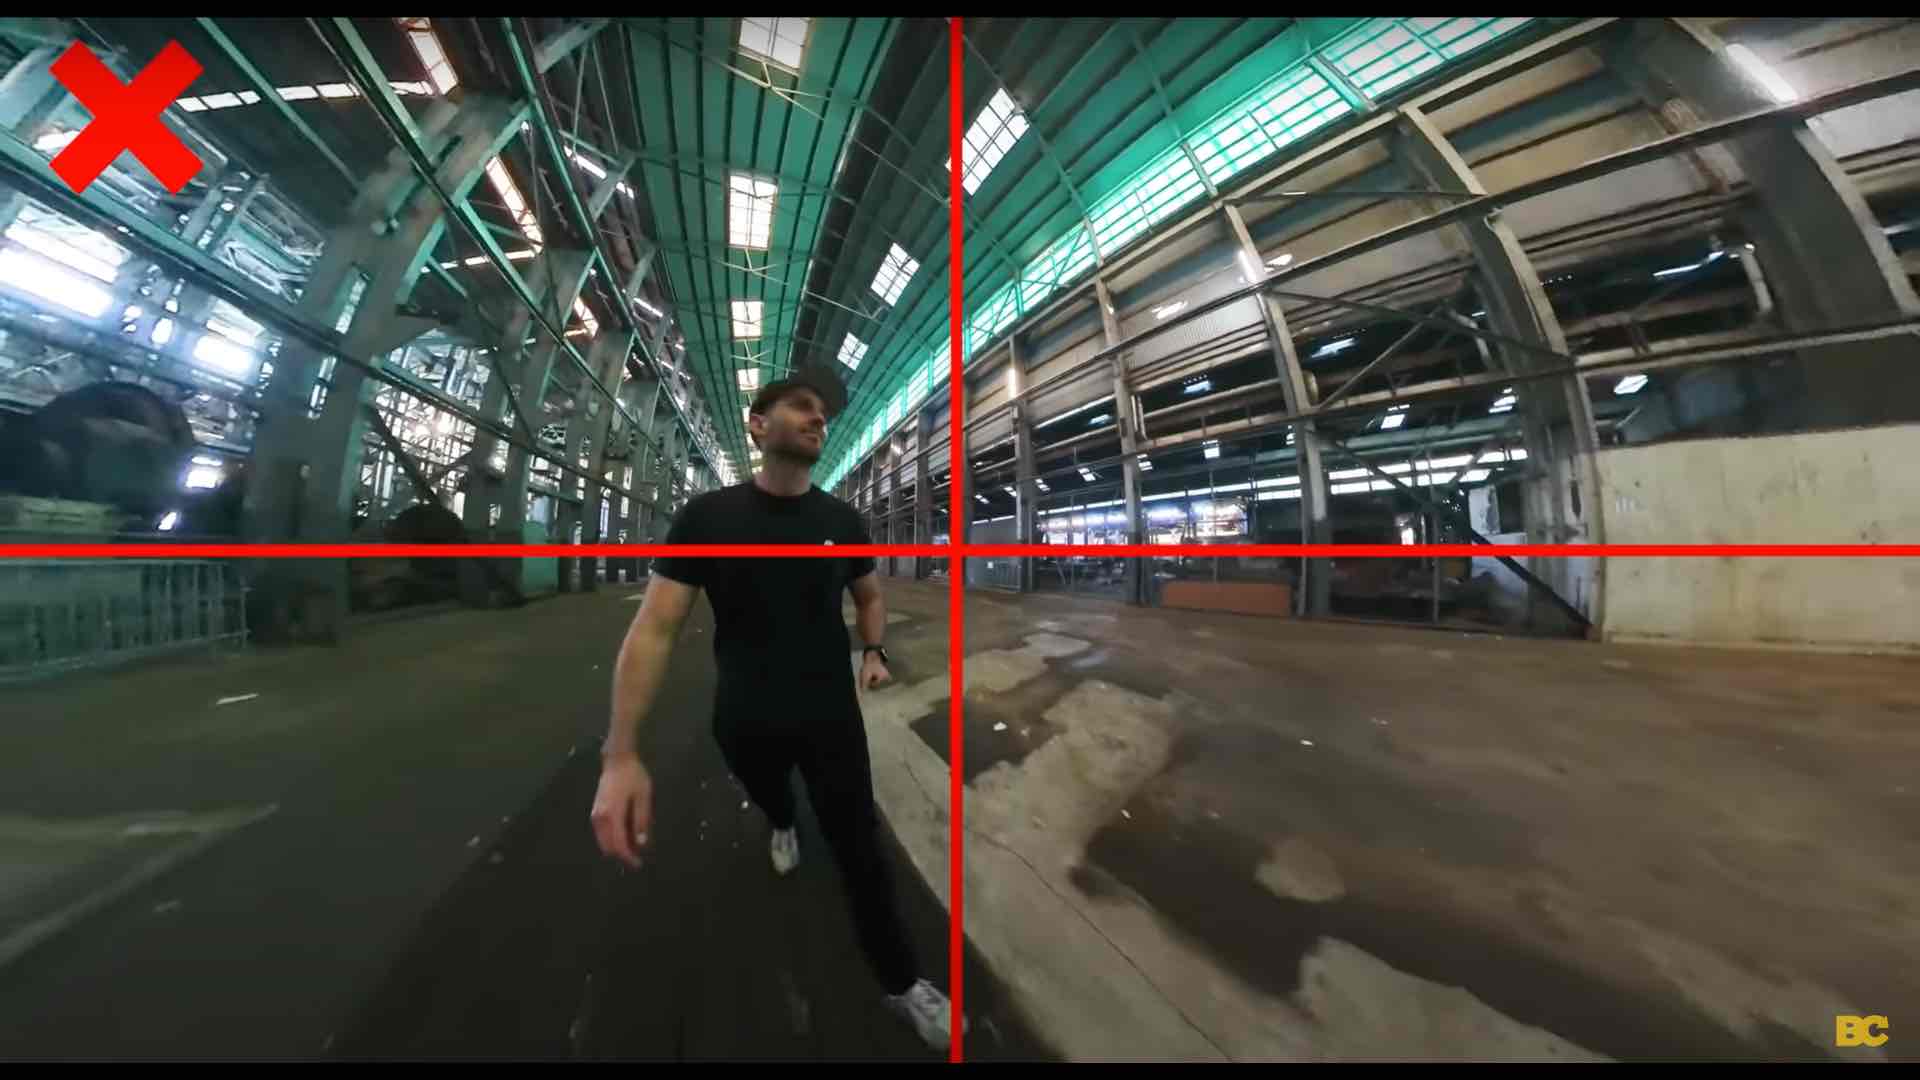
In traditional cinematography, symmetry is used to create a sense of direction and a visually pleasing composition. This same principle applies to reframed 360 videos if you want them to look cinematic.
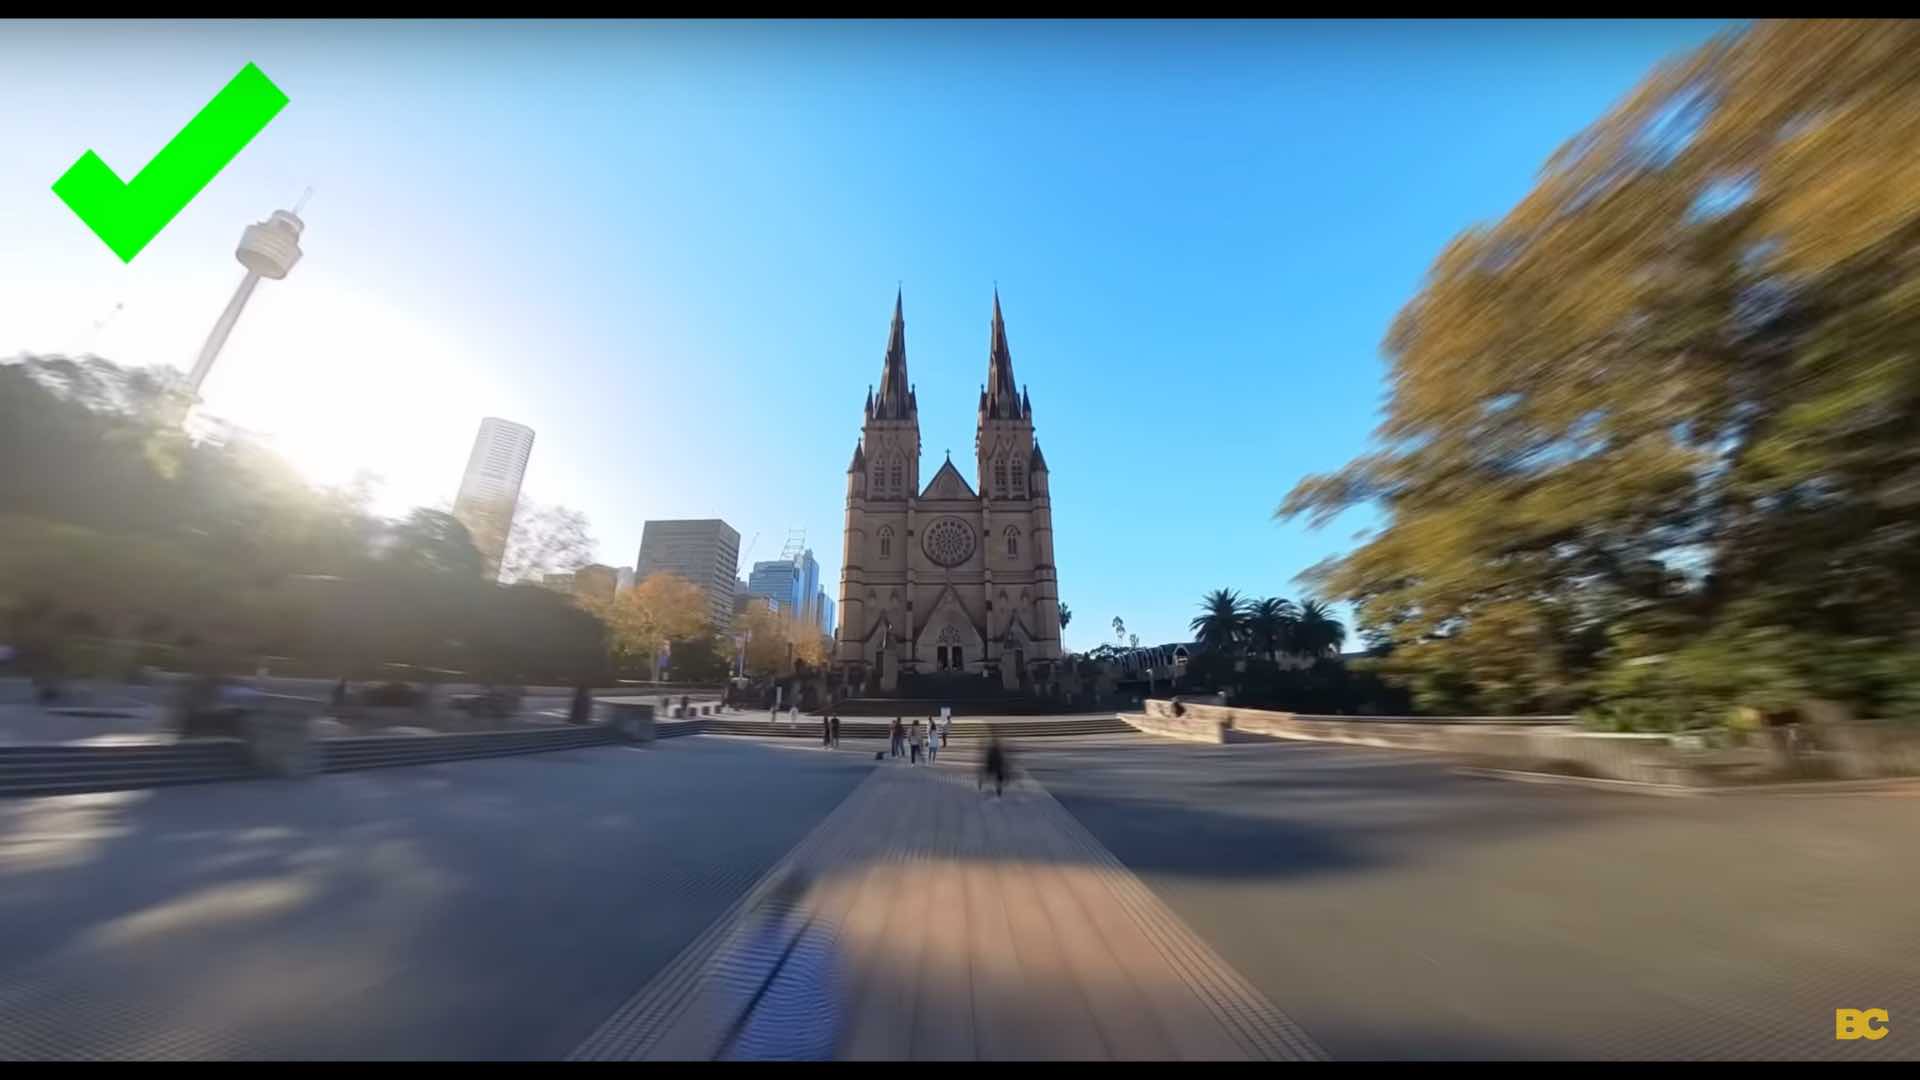
3. Hyperlapse & Motion Blur 📸
My next tip is if you're an Insta360 camera owner, which I know most of you are, using the hyperlapse effect with added motion blur.
This effect is super simple to achieve. All you need to do is walk through a location in a somewhat forward direction, then later in reframing, speed it up to 16 times, check the motion blur effect in either Insta360 Studio or the Insta360 mobile app. This one effect alone can bring any scene to life, no matter how boring or everyday it might seem in real life. Turn it into a hyperlapse with a motion blur effect, and suddenly it's a visual masterpiece. The ideal length to film your hyperlapse is roughly between 2 and 10 minutes, and when you speed it up, you're aiming for a clip that's anywhere between 5 and 20 seconds.

4. Utilizing Freeze Frame 📽️
Another fantastic speed-related effect you might want to try in the Insta360 mobile app is Freeze Frame. What Freeze Frame does is it takes a split second of your video, slows it down to super slow motion, and then you can reframe from one side to the other, creating a Matrix-like effect. So if you've got any kind of action in your scene, the Freeze Frame effect can turn everyday moments like me frolicking at the beach into epic slow-motion shots.
5. Smooth Camera Movement 🤳
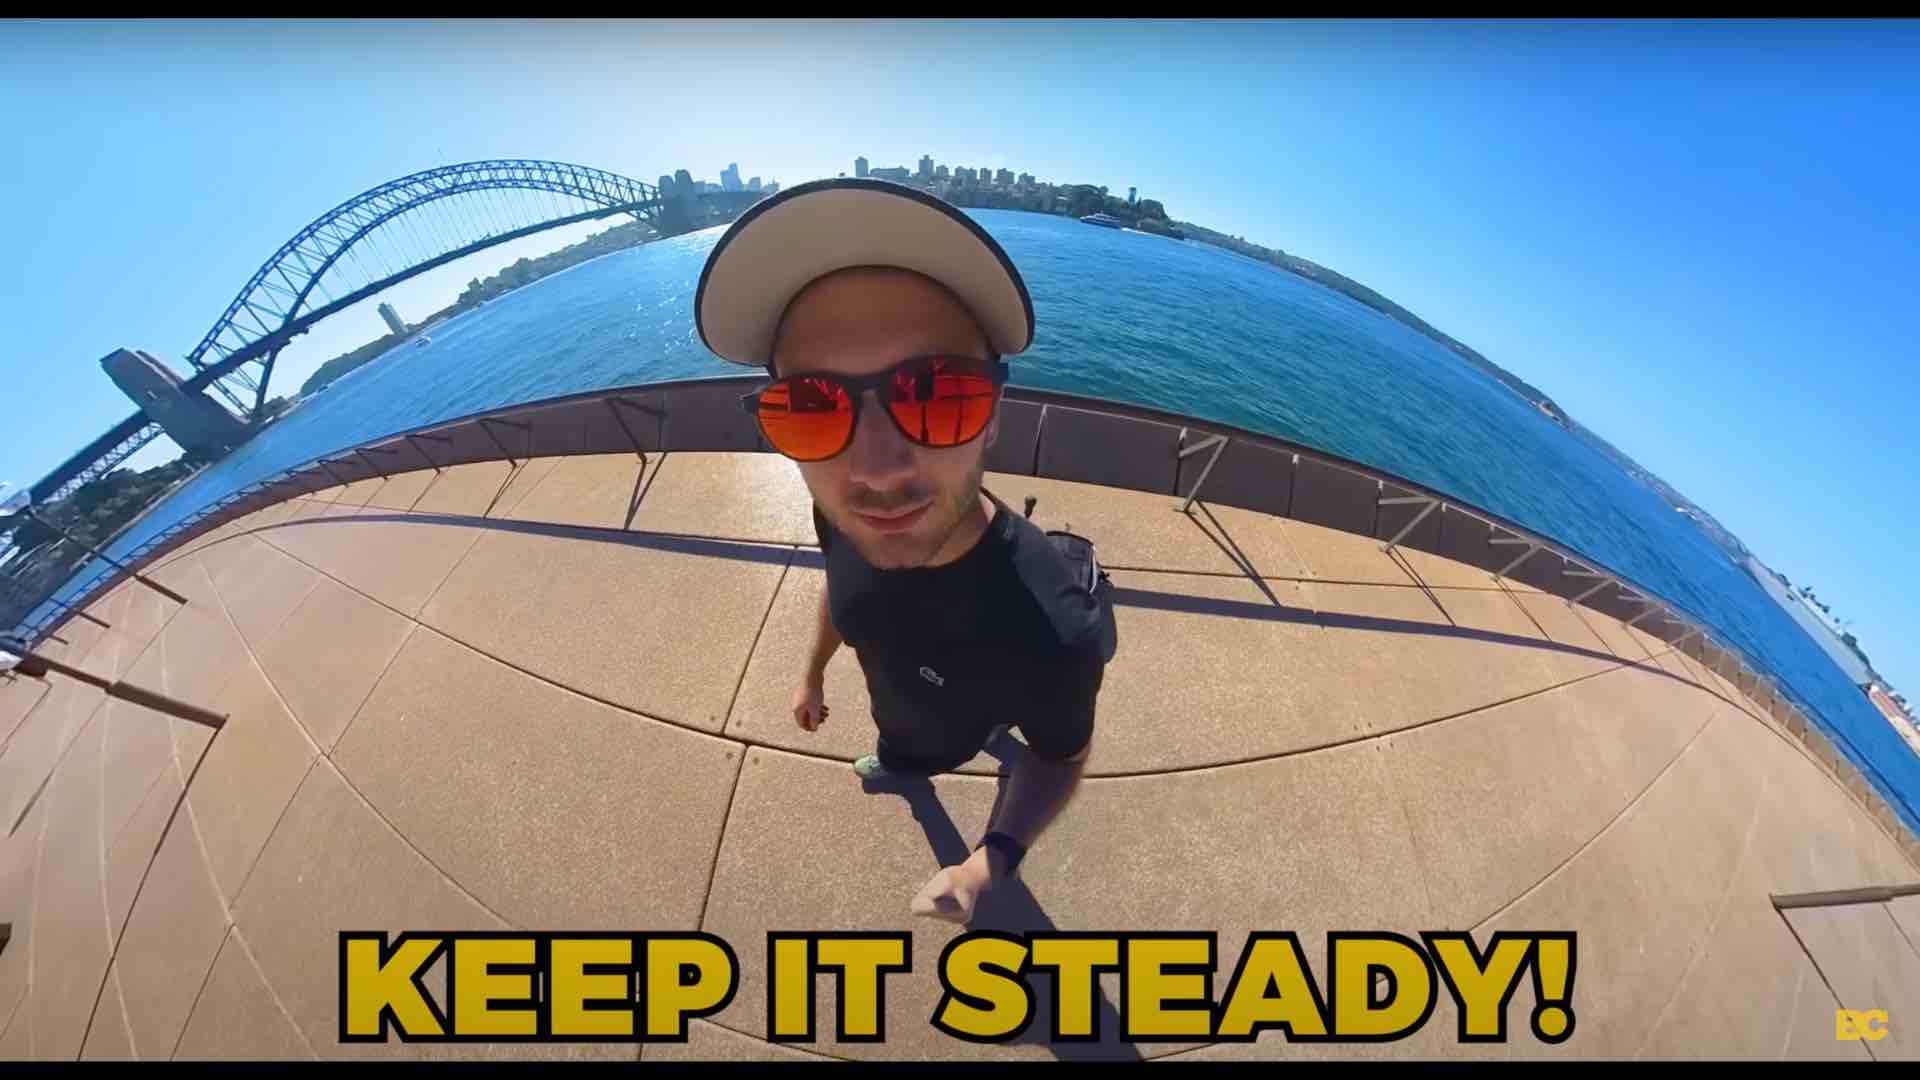
Tip five is to make your camera movement as smooth as possible. Despite most 360 cameras having perfect stabilization, it's always a good idea to make your camera's movement as smooth as possible. Too much up and down movement or side-to-side movement will still make your shots look shaky even when they are stabilized.
Whereas keeping your camera move smooth and consistent, almost as if the camera were floating through the air, will produce the smoothest viewing experience later on. By the way, you don't actually need expensive gear to achieve cinematic shots. Most of the time, I use the free Insta360 selfie stick that came with the X3, and for most shooting situations, it's more than enough.
6. Setting Your Exposure Manually 📷
Tip six for getting a more cinematic look is setting your exposure manually. While auto exposure does a fine job in broad daylight, in any kind of trickier scene like mixed lighting or at night time, it's going to fail epically.
Not only will it sometimes choose the wrong settings, but it will also change the exposure constantly as you're shooting, resulting in brightness levels changing throughout.

Whereas what manual exposure does is it fixes the exposure settings in place and doesn't change.
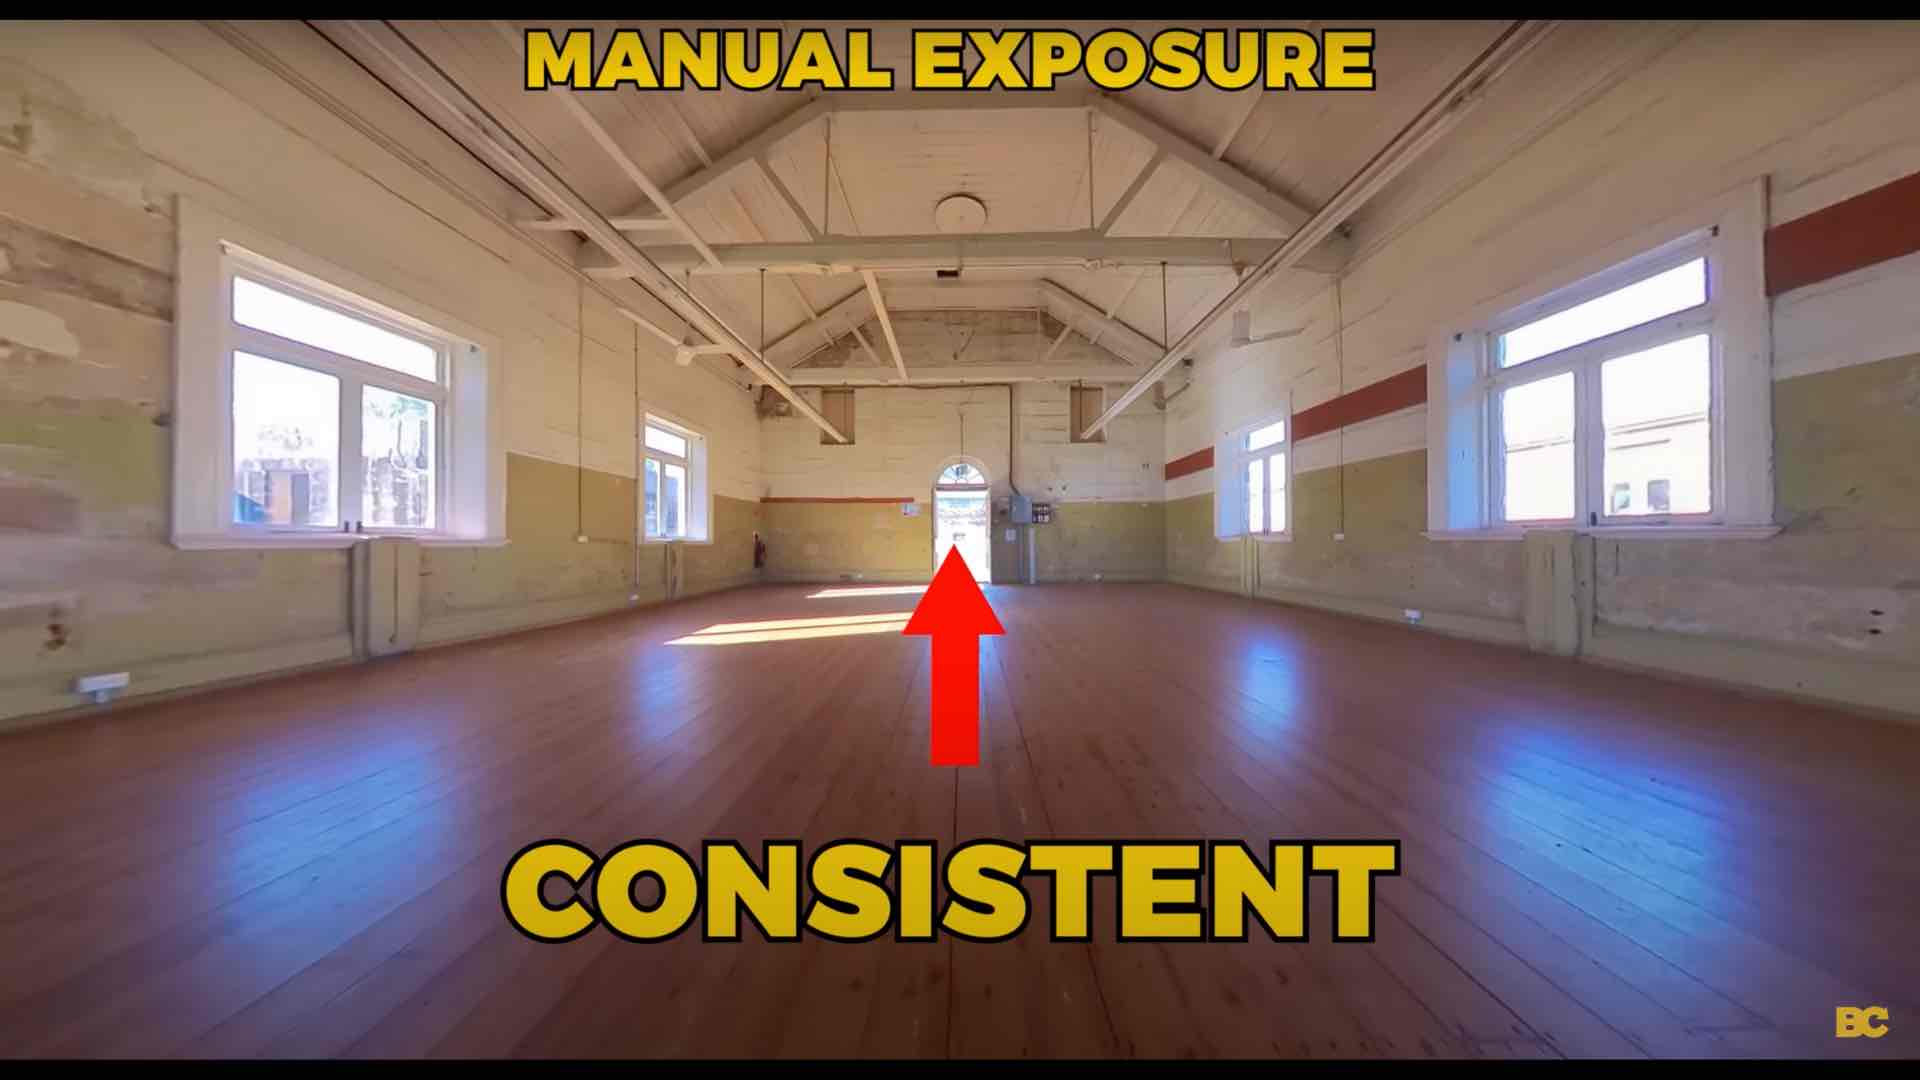
This means you can also prioritize keeping your ISO as low as possible and choosing the right shutter speed for whatever type of shot you're capturing.
In mixed lighting, you'll want to pay close attention to overblown highlights coming through windows, since these can be overpowering and blow out entire sections of your video, which will instantly give your clips a low-quality feel.
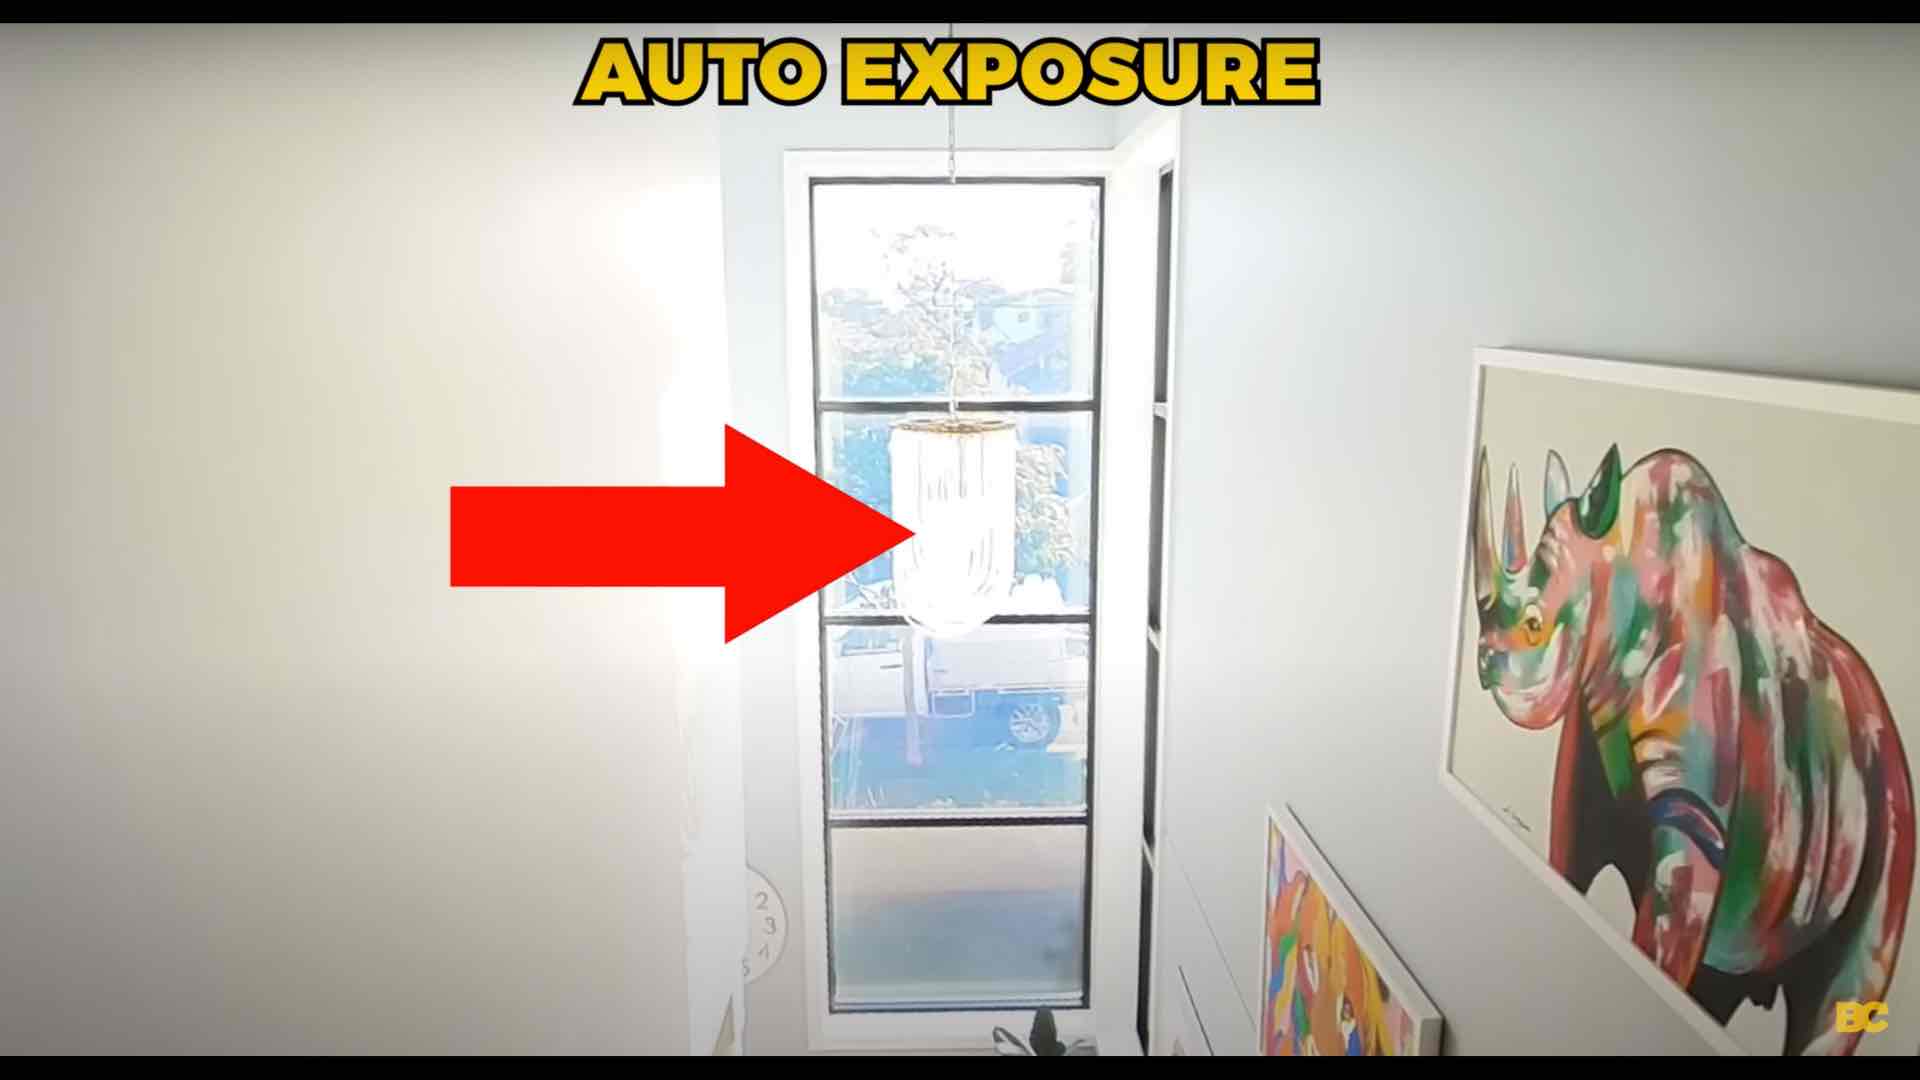
So in these types of situations, try setting your exposure a bit darker so you can keep those bright highlights under control, since bringing up shadows is much easier to do in color correction than bringing down overexposed highlights.
This one aspect alone will make your videos look so much better, especially in mixed lighting and at night. And I'm only just scratching the surface here.
In my 360 Video 101 Course, I have an entire module dedicated to camera settings, so you can understand every single exposure setting of your camera and get perfect exposure with every shot you take, regardless of whether you're shooting in broad daylight, tricky mixed lighting scenes, or at night when it can be especially hard to expose your shots properly when there isn't a lot of available light to help you.
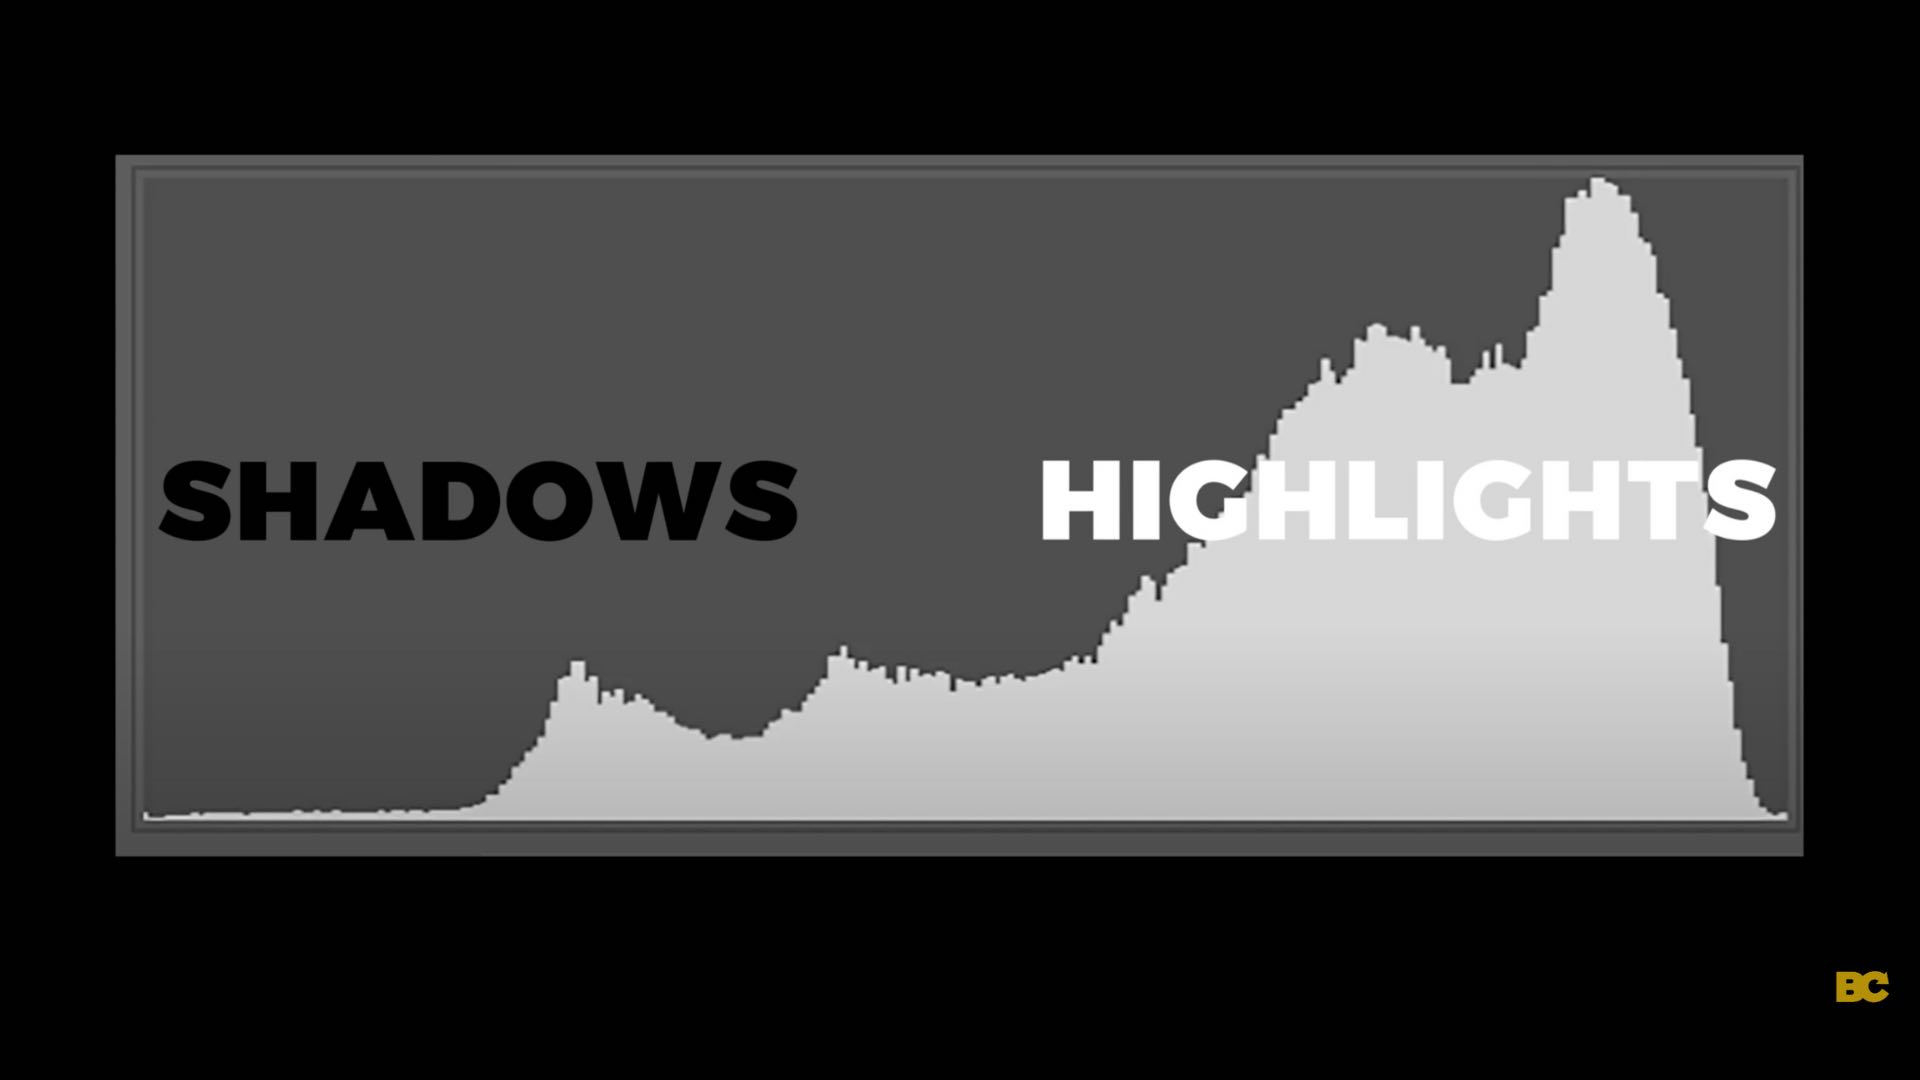
7. Using The Histogram 📲
Moving on to tip seven, and to help you achieve better exposure, you'll want to consider using the histogram, again assuming you're using an Insta360 camera.
Inside the Insta360 mobile app in the menu, you can bring up a histogram.
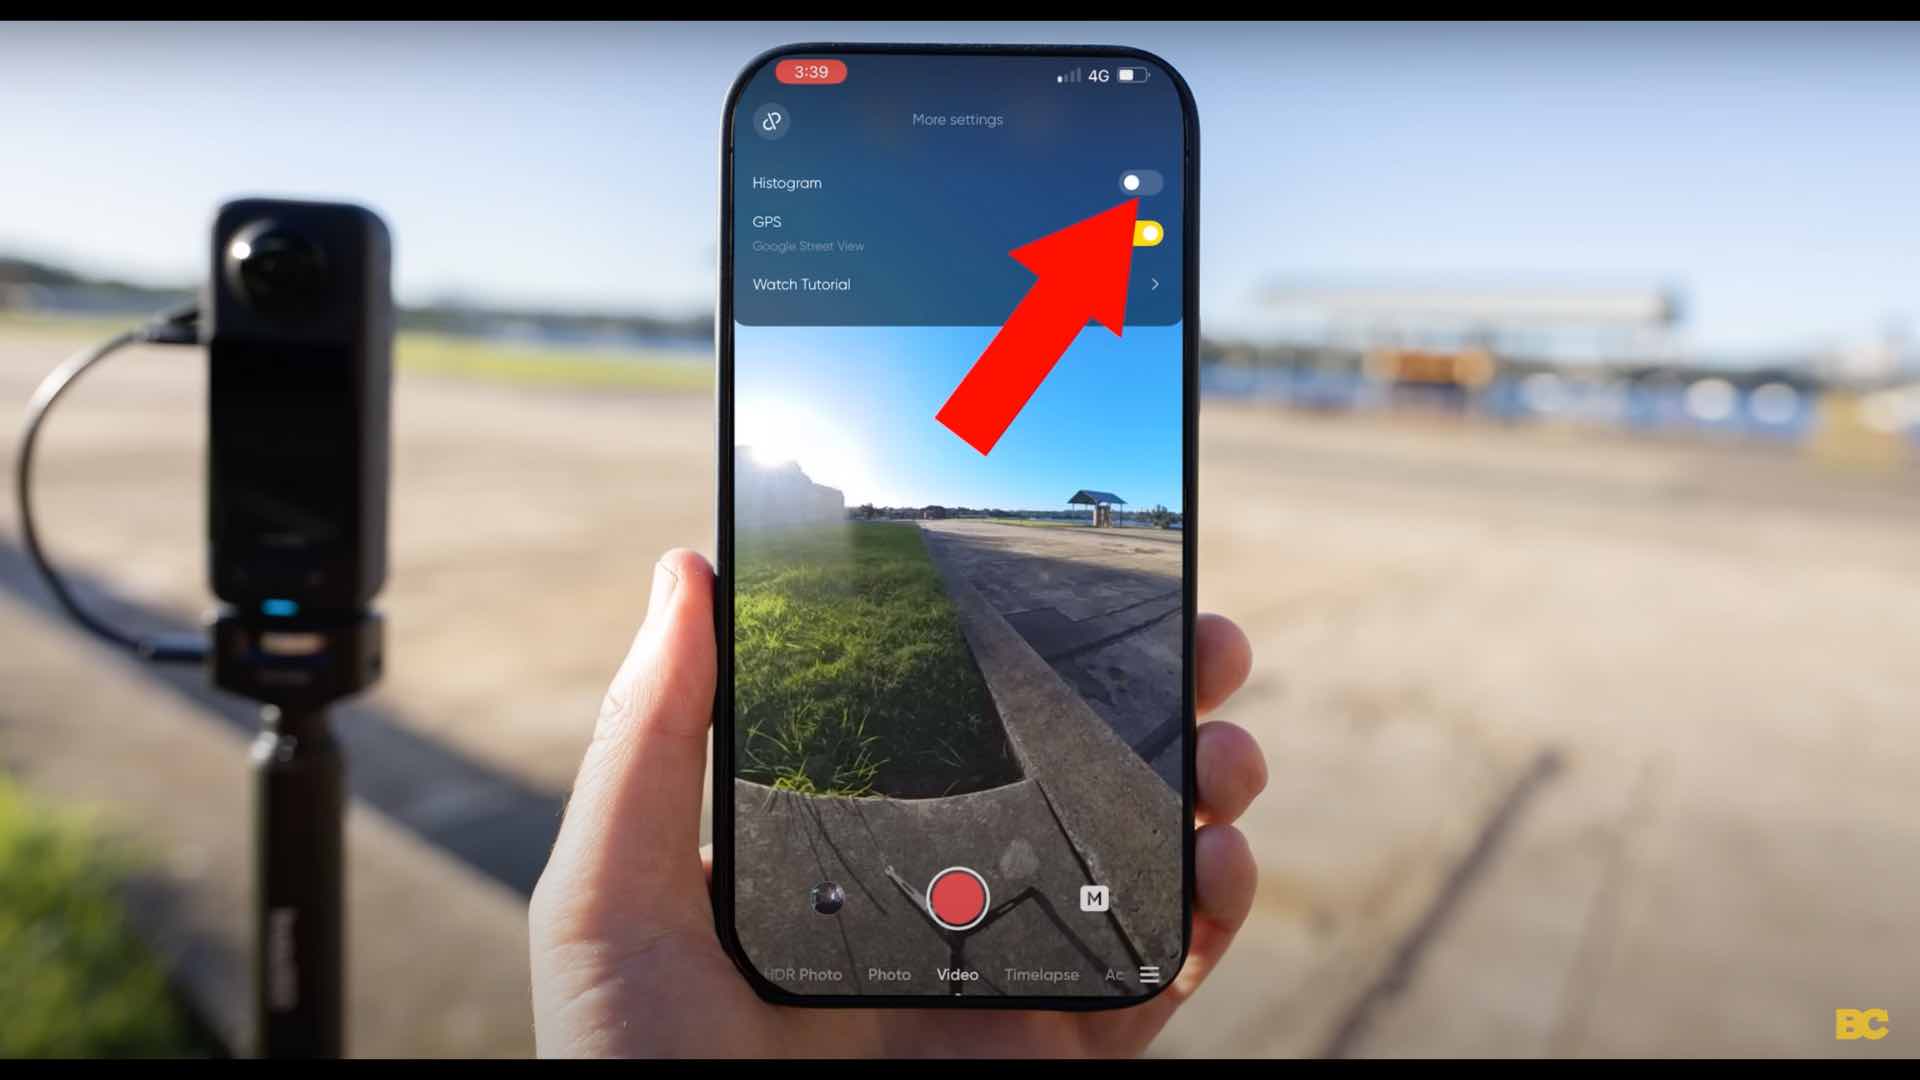
A histogram is a visual representation of the exposure levels of your scene, with the left-hand side being the shadows and the right-hand side being the highlights.
What you want to avoid most is the histogram clipping on either side, since this means that your shadows are so dark or your highlights are so bright that no information is being captured whatsoever; it's just pure black or pure white.
Therefore, you won't be able to recover that detail in color correction. Now keep in mind that since 360 cameras do see everything, they're also going to see the sun, and they'll see the darkest shadow, even if it's 100 meters away, it will see it, and that will, therefore, register on the histogram.
So if it does clip slightly, it's usually because of those things, and that's okay, as long as it's not completely bunching up on either side.
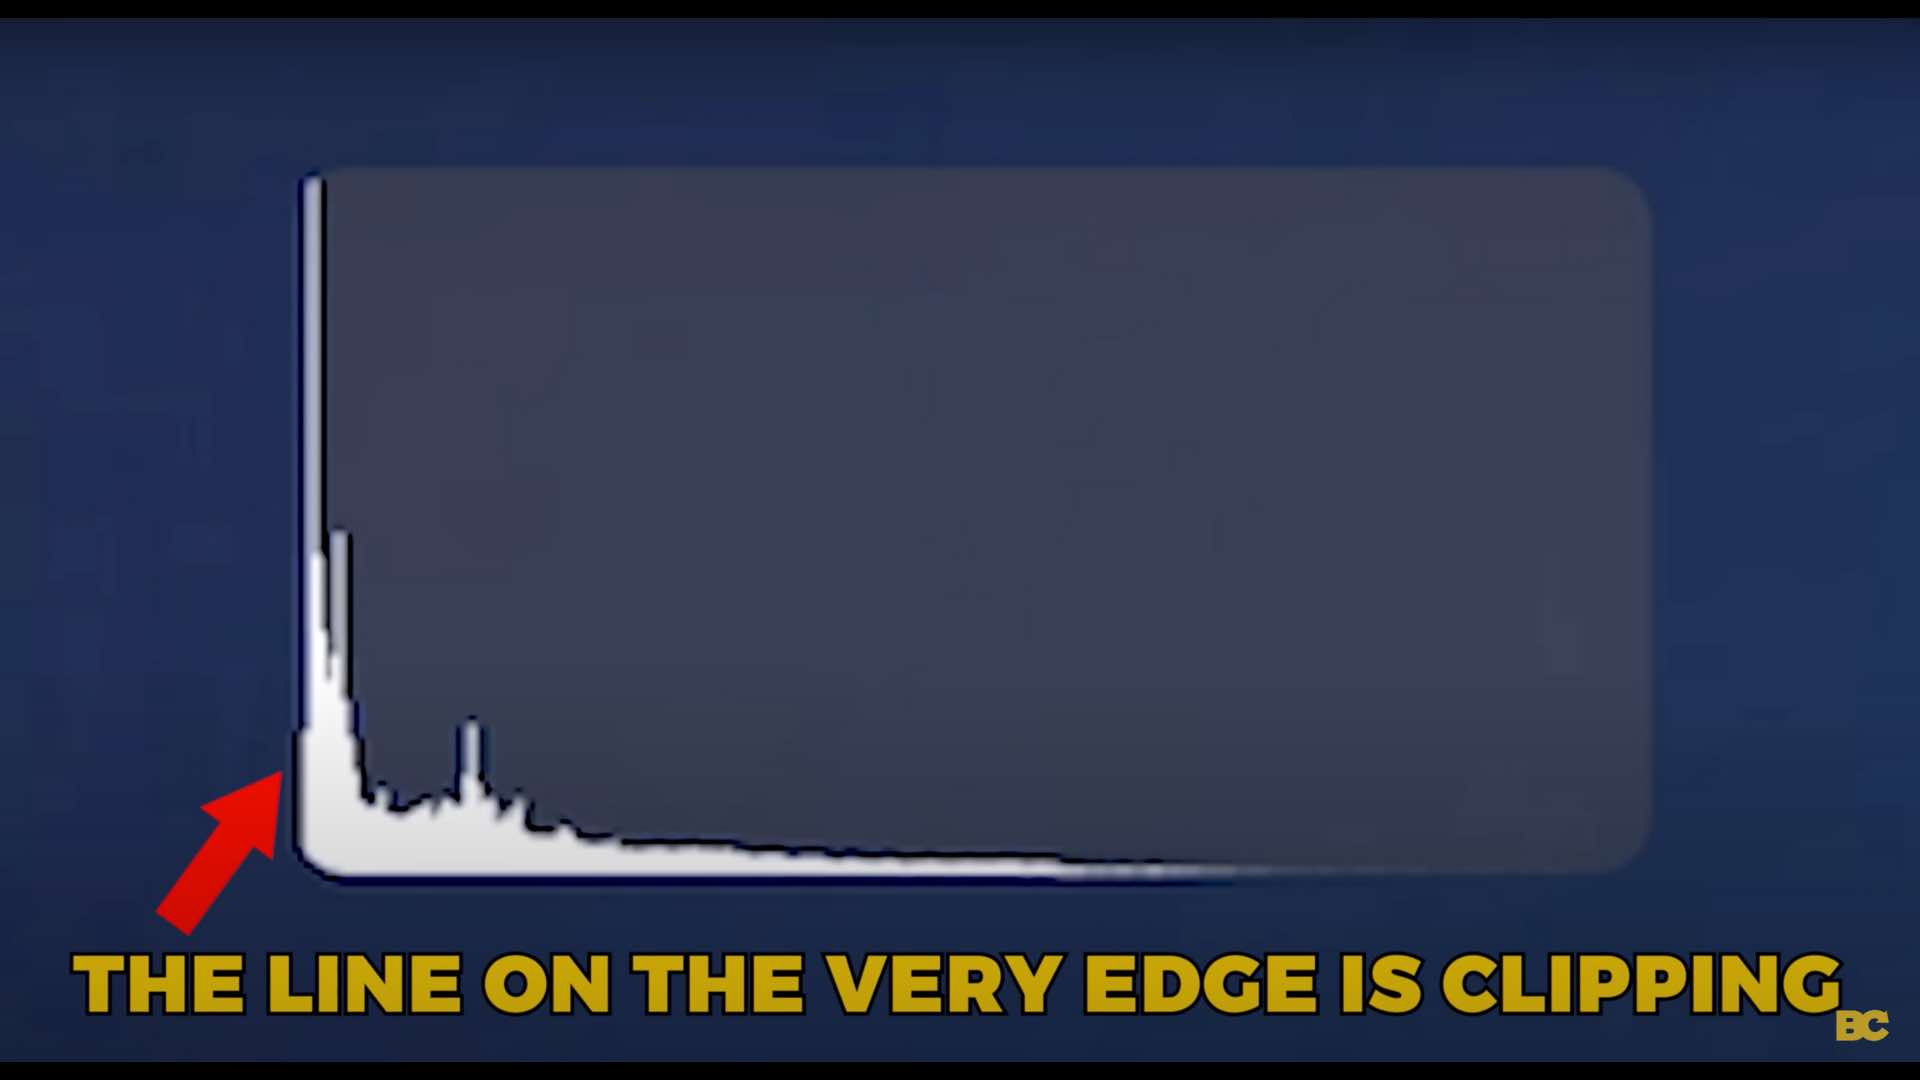
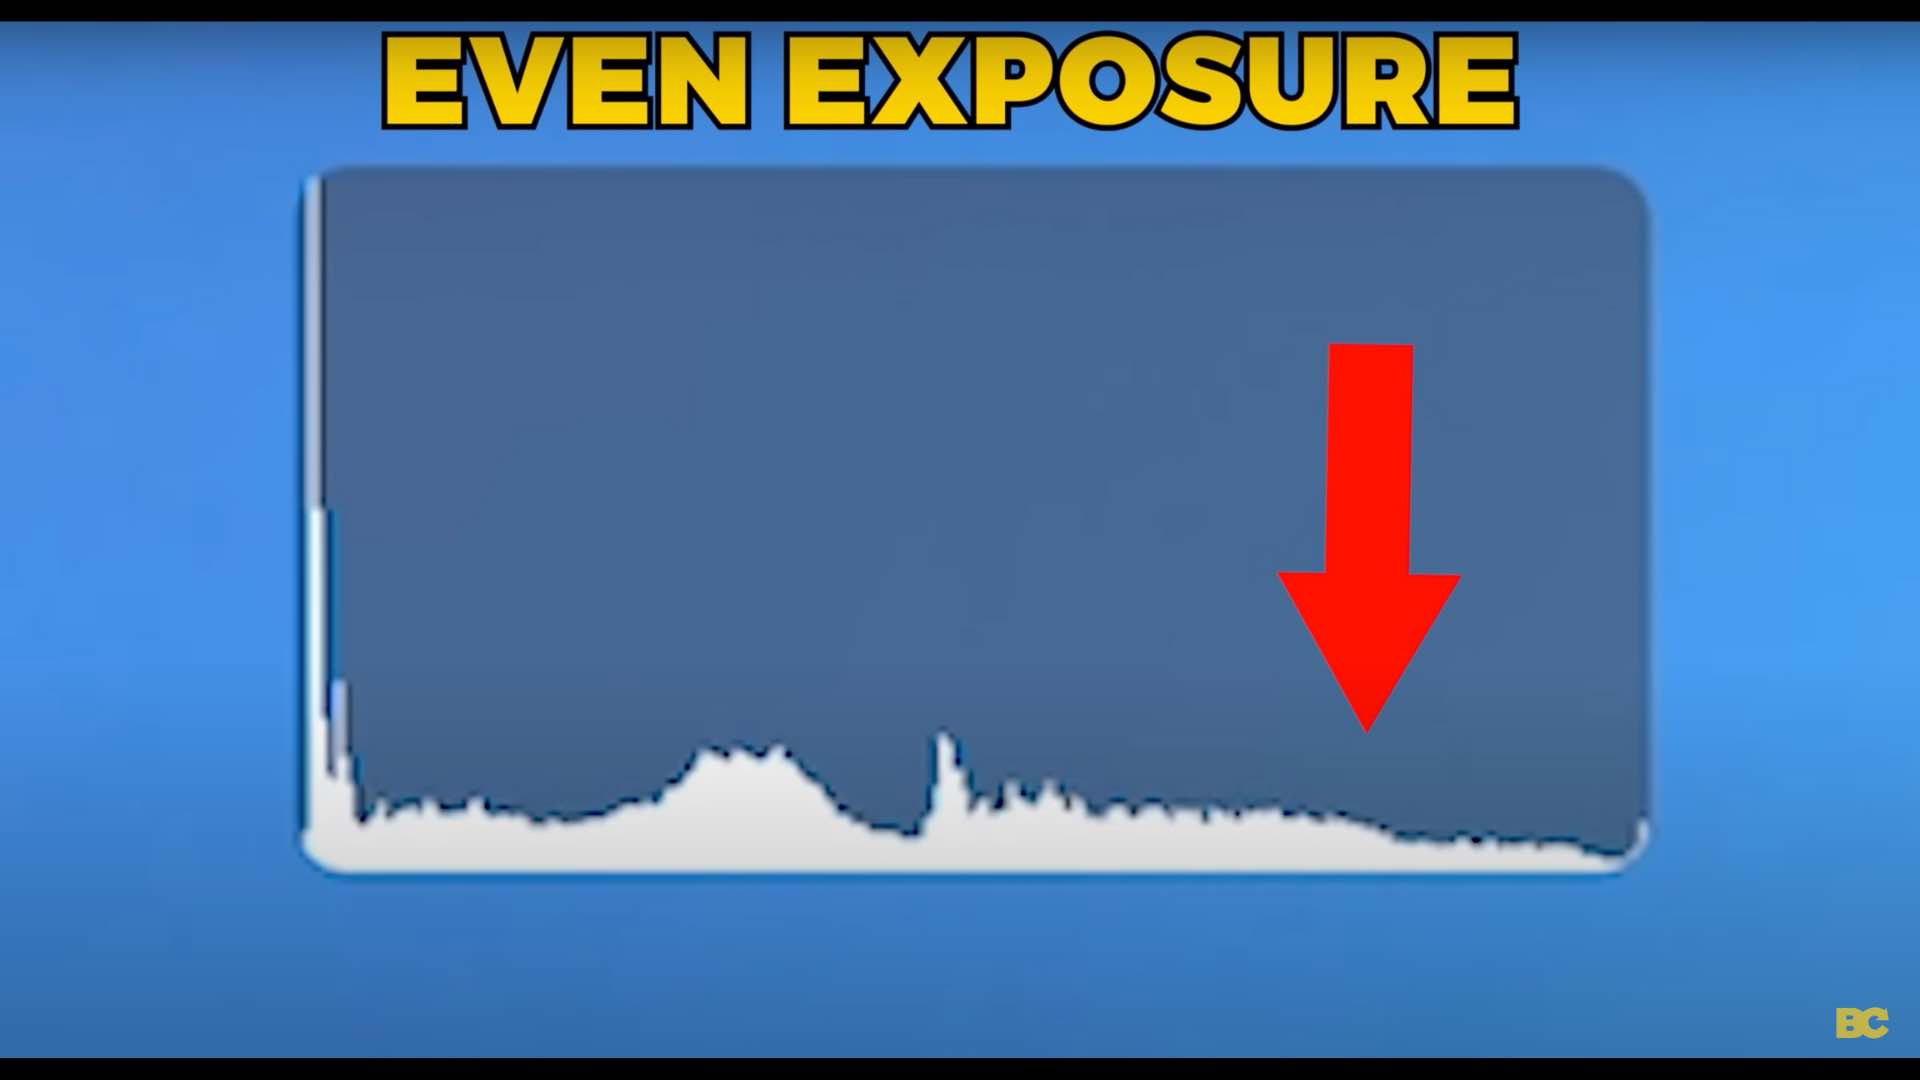
If it is, adjust your ISO and shutter speed so the histogram looks more like a mountain that spreads evenly from the left to the right.
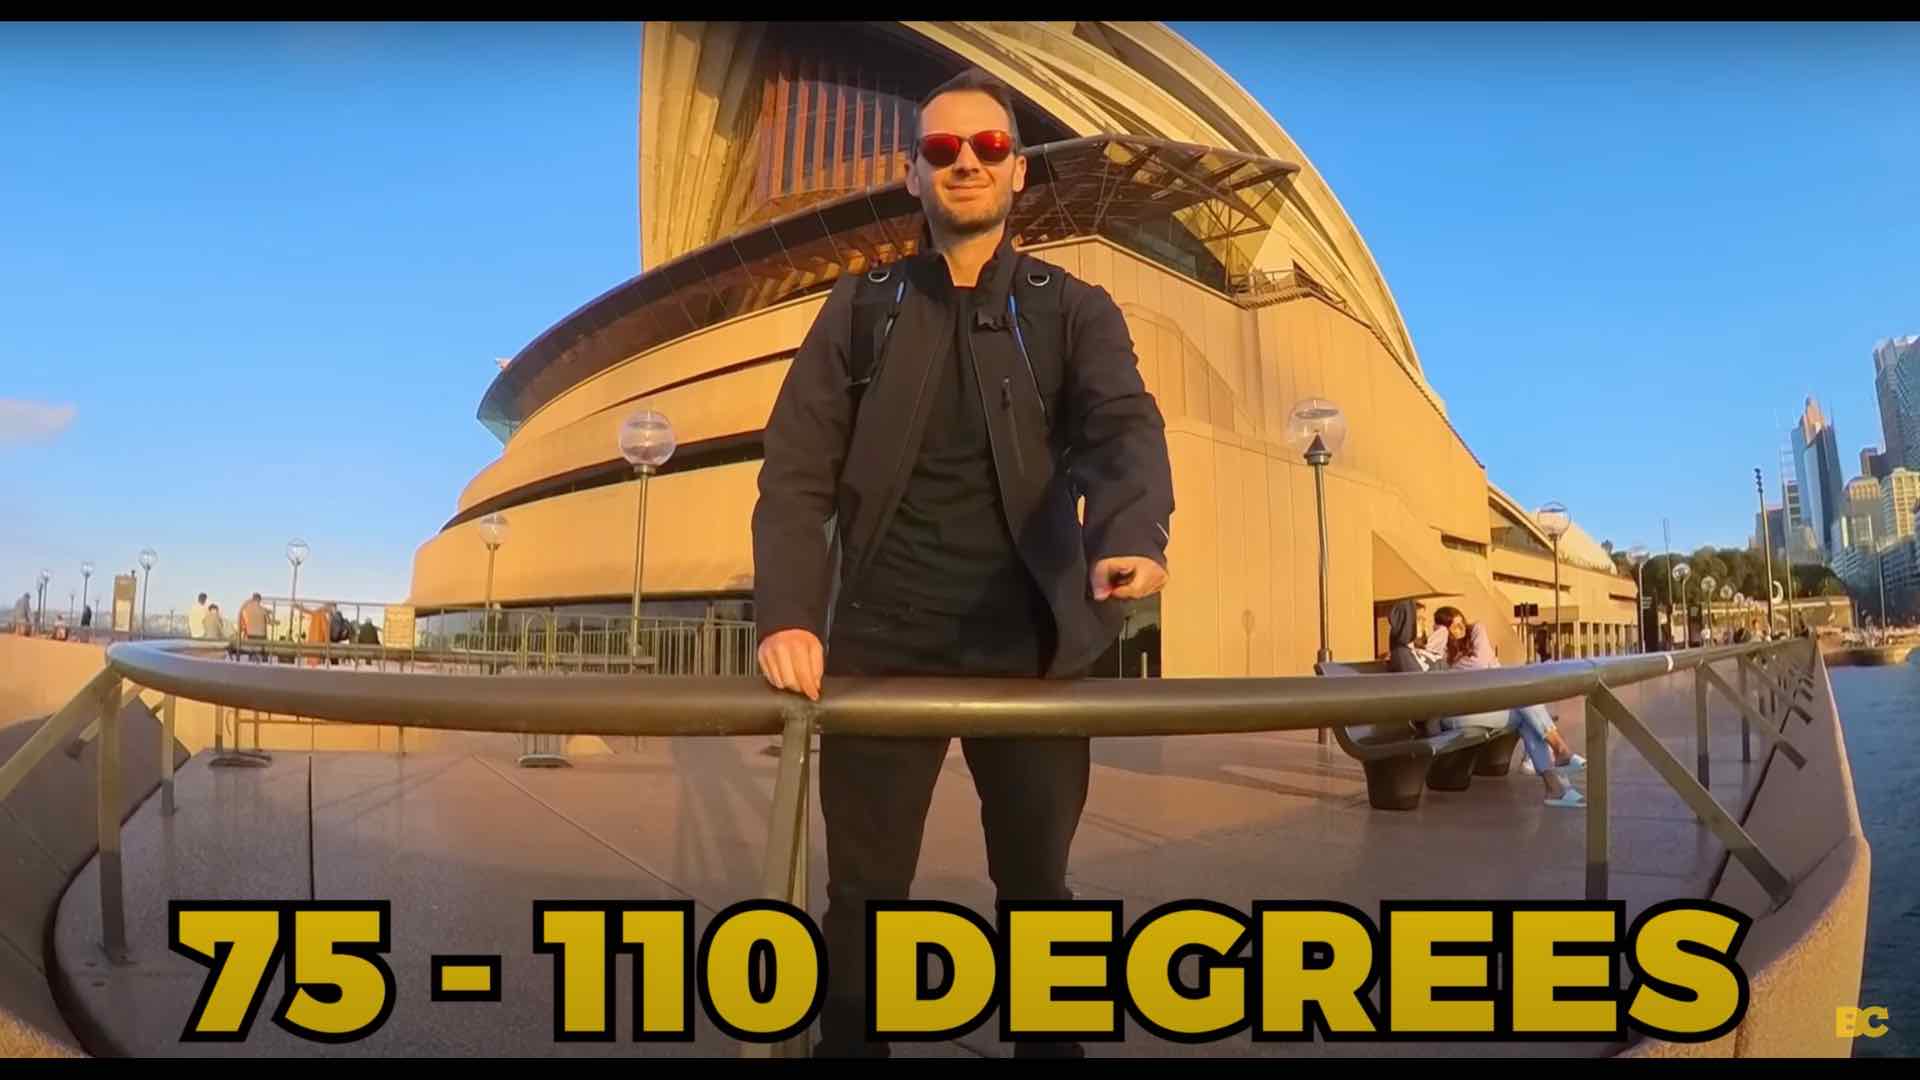
8. Choose The Correct Field Of View 🎯
Tip eight is choosing the correct field of view, not too narrow or too wide. Since reframing 360 videos is essentially just cropping in closer, if you zoom in too far, this will make your videos look extremely low quality. On the other end, if you go too wide, it can cause a fisheye effect that can look gimmicky.
Using a field of view between 75 and 110 degrees is usually the sweet spot of wide but not too wide. Remember, you can always change the zoom level later in editing to whatever best suits your scene.
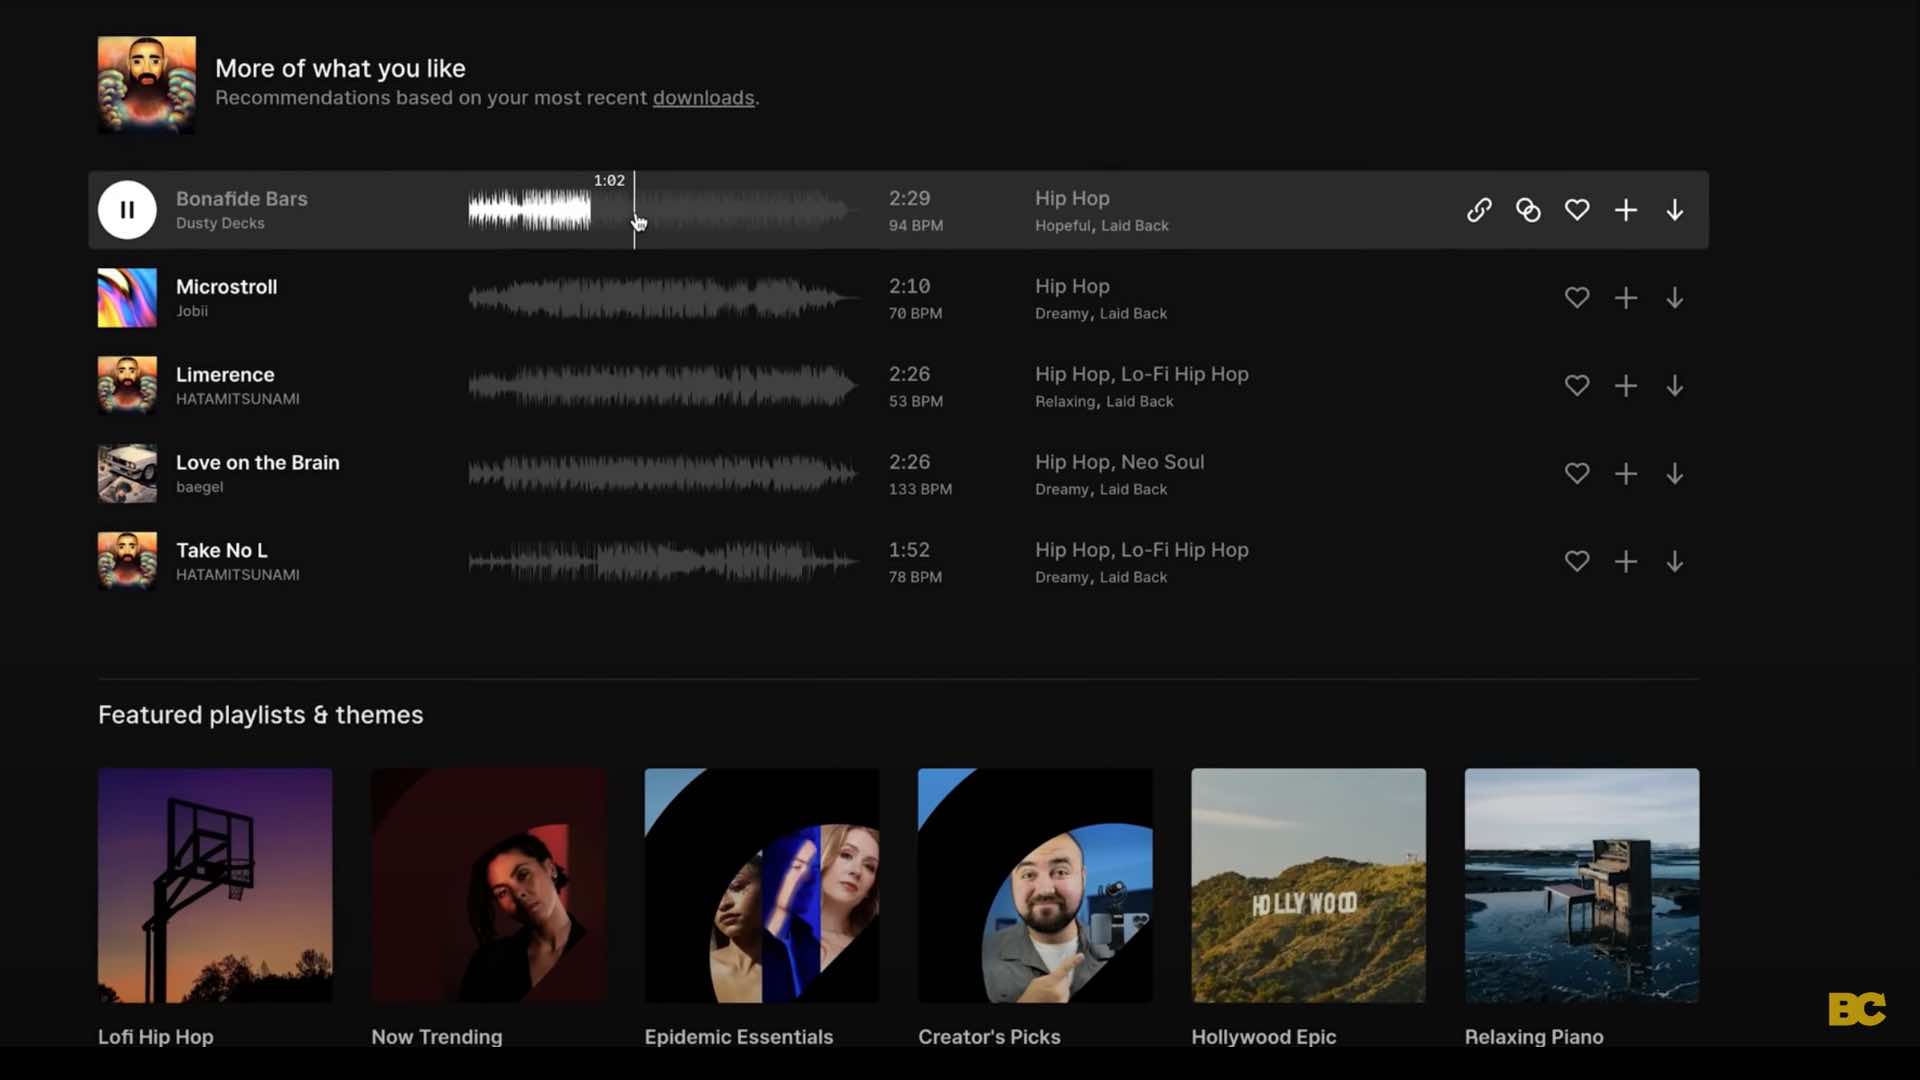
9. Selecting The Correct Music 🎵
Tip nine is finding the banger music track.
You can do all the right things with your camera settings, your shooting techniques, your reframing, your editing, but if you use the wrong music track, suddenly your video can completely lose its impact or not quite have as much impact as it could. Which is why I can't recommend enough spending the time to find the right music track that perfectly fits your edit.
In general, this takes me anywhere from about two minutes to half an hour, and I'll test a minimum of five different music tracks just so I can be sure I've got the best one for my edit.
That said, sometimes you just know the track works. It works, so don't skip this step. Finding the banger music track is totally going to be worth it. I personally use Epidemic Sound for all of my videos. They've got a fantastic library. However, there are heaps of options out there, so use whichever platform you prefer.
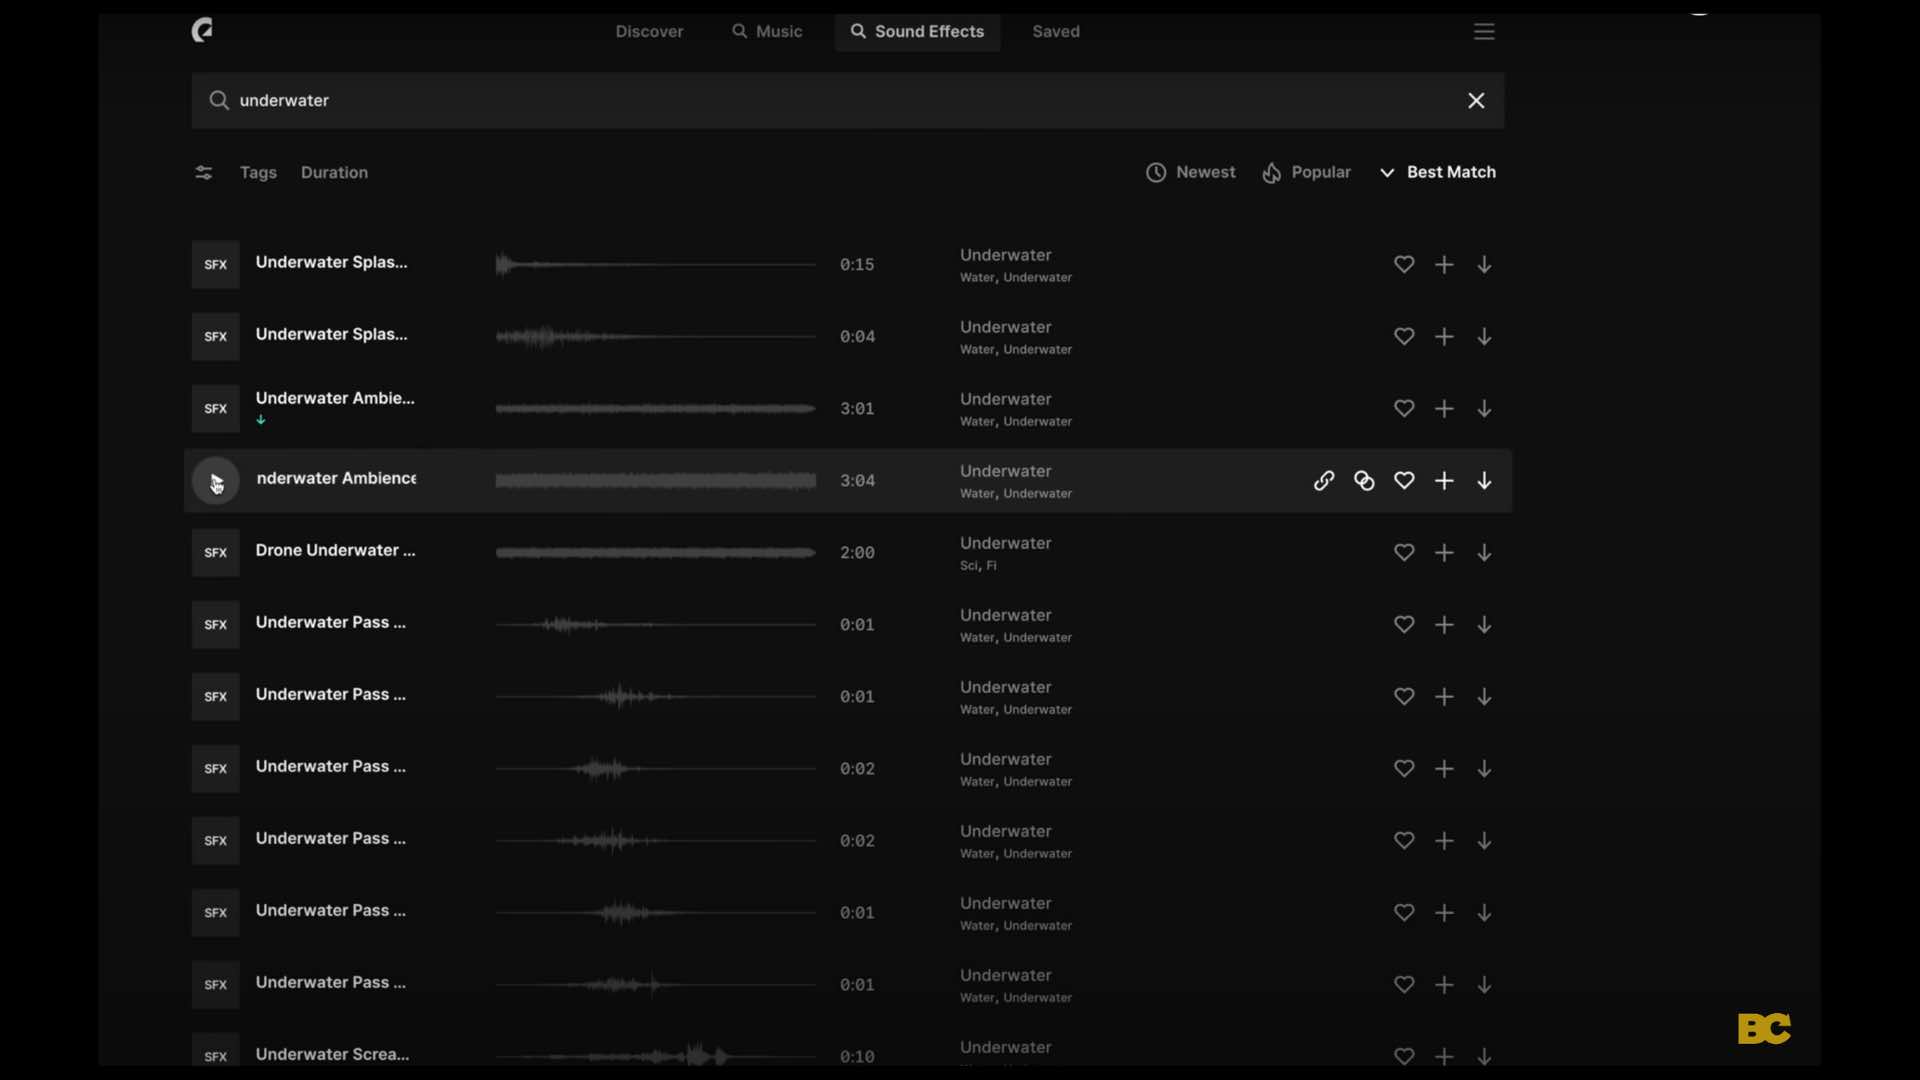
10. Well-Placed SFX 💥
My final tip for cinematic reframed 360 videos is one of the most underrated things ever. The cinema, also known as video or content watching experience, isn't just about video. When you're watching a video, two equal mediums are playing simultaneously: 50% is video, and 50% is audio. What I've found recently has really taken my videos to the next level is using sound effects more creatively. So finding sound effects that sync perfectly with the action in my videos.
For example, if it's a hyperlapse and you're walking, add the sound of footsteps. If something passes you by, a whoosh sound effect would go great. If there's any focal points in your clip, like a boat and a boat horn, you get the jist. Giving the microelements of your videos a matching sound elevates them to become so much more. And you've got to admit, there's something extremely satisfying about listening to a well-placed sound effect. So think about how you can add sound effects into your videos to make them that extra bit more satisfying. Again, I use Epidemic Sound for this. They've got a pretty good library, as do other platforms.
That's it for my top 10 tips for cinematic 360 videos. Each one of these holds a key for better video content that will resonate that extra bit more with your audience!
Happy 360ing!
Ben Claremont
Blog Author


